
Cranberry Apple Butter
January 22, 2012 § 1 Comment

The Flying Biscuit in Atlanta is one of my favorite breakfast places. So when The Flying Biscuit opened in Gainesville a few years ago, I was really excited. I’ve always thought one of the best items on the menu are the biscuit (of course) which are served with this fantastic and fragrant Cranberry Apple Butter.
Cranberry Apple Butter
2 C. Dark Brown Sugar
1 Cinnamon Stick
1-1/4 tsp Ground Cinnamon
1 tsp Ground Nutmeg
1 tsp Ground Cloves
1 C. Orange Juice
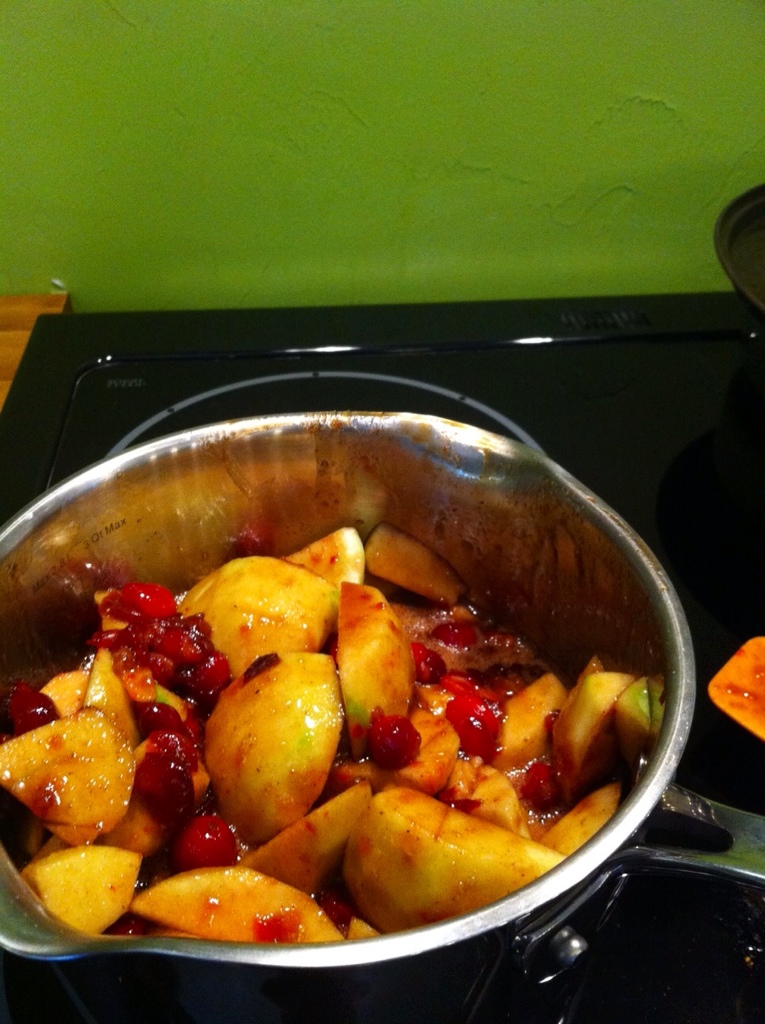
2-3 C. Fresh Cranberries
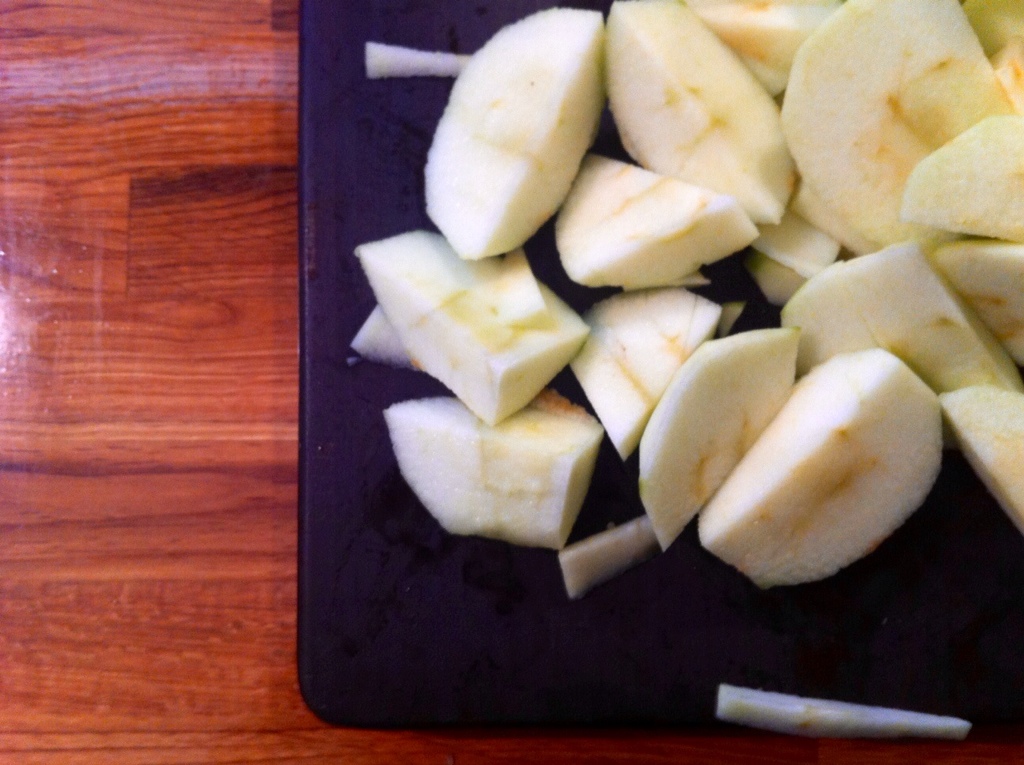
10 Granny Smith Apples – peeled, cored and chopped
Add sugar, spices and orange juice to a large pan and bring to a simmer. Add cranberries and simmer until the cranberries begin to pop. Add apples and cook on low until apples begin to fall apart. Once all apples are cooked, remove from heat and puree with a stick blender or in a food processor until very smooth. This butter can be eaten warm, or cool completely and store in the refridgerator for up to 3 weeks.

Baba Ganoush Recipe
June 14, 2011 § Leave a comment

I really wanted to title this post “How to use eggplants when you HATE them” because I really dislike eggplant. Nothing I’ve ever made with them has turned out remotely edible… until now.
Baba Ganoush is a smokey Middle Eastern dish that has the same texture as hummus. It’s really very easy to make and pretty healthy if you make it as I’ve done below. If you’ve never made hummus or Baba Ganoush, There is one unusual ingredient: Tahini. Tahini is the paste made from ground sesame seeds – it reminds me a bit of peanut butter. Make sure to stir Tahini really well before using – the paste is very dense at the bottom of the container.
Also be aware that this recipe is heavy on garlic. Use only 1 clove if you don’t want really bad breath. I love a strong garlic flavor and have only the kids at home who have to deal with garlic breath – so I went for 2 cloves.
Baba Ganoush Recipe
2 Eggplants sliced down the middle length-wise
1 tsp plus 1 Tbs Olive oil
2 Cloves peeled garlic
2 Tbs Tahini (make sure you stir well before using
Juice of 1 Lemon
1/2 tsp Chili Powder
1/2 tsp Ground turmeric
1/2 tsp Ground Cumin
Sea salt and pepper to taste
- Preheat the oven to 375 F.
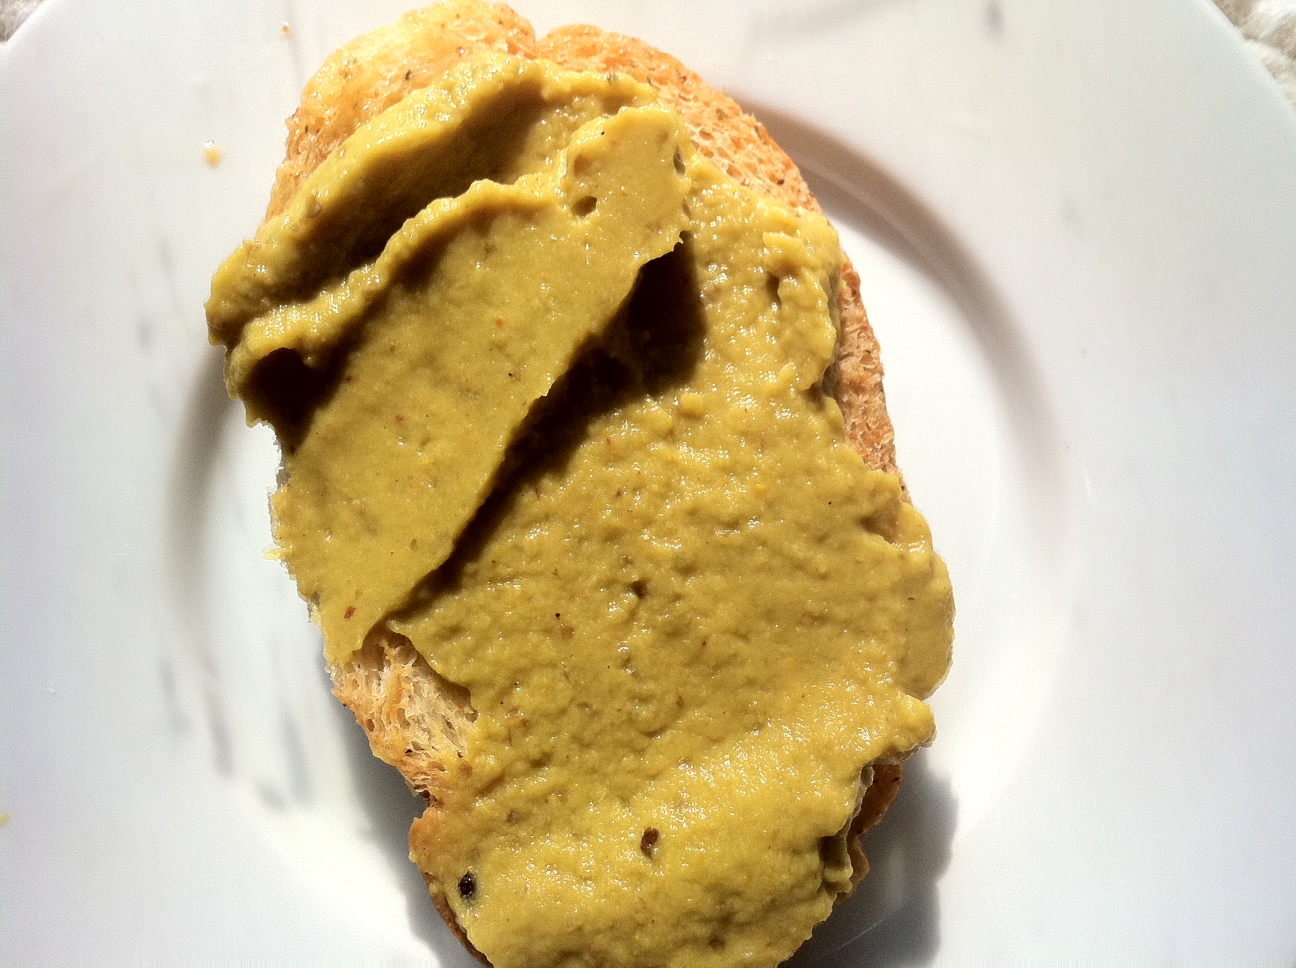
- Drizzle eggplants with 1 tsp of olive oil and bake on a baking sheet for about an hour or until fork tender. Once the eggplant has cooled, scoop out the flesh (sometimes you can peel off the skin) and put it into a food processor along with the rest of the olive oil and the remaining ingredients. You can adjust the spices and salt and pepper to taste if you’re partial to more of one spice. Run the food processor until the consistency resembles hummus.
- You can eat it warm or cool. Letting it sit in the fridge overnight gives the flavors a chance to blend.
- Serve the Baba Ganoush with toasted whole wheat pita, vegetable sticks, or toast. It’s a great appetizer or light dinner.
- One half cup and one pita loaf has about 250 calories.
Garbanzo Bean and Sprout Patties Recipe
May 23, 2011 § Leave a comment
I was a vegetarian for more than 5 years in the 90’s (that sounds sooooo long ago). When I got married and had kids, I started eating meat again to make preparing meal for my omnivorous family members a bit easier. Over the years though, I’ve felt a bit conflicted about the amount of meat we eat, what it does to the environment, and how the animals are treated before slaughter.
I’ve been wanting my family to eat much less meat for awhile now. I am on the edge of becoming a vegetarian again, but haven’t wanted to impose on the rest of the family by refusing to cook meat. So, when I find vegetarian (even vegan) recipes like this one that my family *might* consider eating, I try it out immediately just to see if I can add one more veggie meal to the list of things that they actually will eat.
This recipe is originally from Heidi Kennedy’s Super Natural Cooking on page 155. She used sprouted garbanzo beans in her recipe, but suggests canned garbanzo beans if you can’t find them.

Garbanzo Bean and Sprout Patties Recipe
Ingredients:
2 cans of garbanzo beans, drained and rinsed
4 large eggs
1/2 t fine sea salt
1/3 c chopped fresh cilantro
1 onion, chopped
Finely grated zest from 1 large lemon
1 c sprouts; such as broccoli or alfalfa sprouts
1 c bread crumbs, toasted, preferably whole grain
1 T extra-virgin olive oil
Directions:
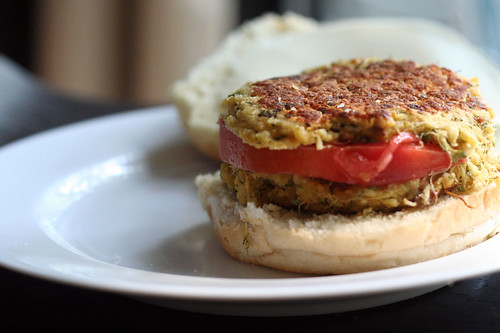
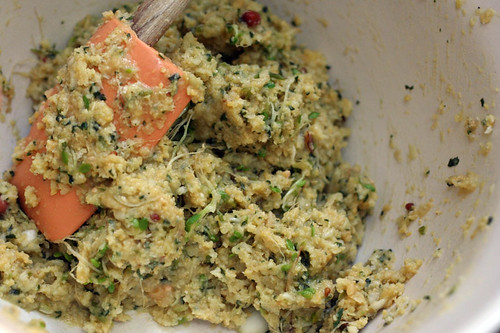
Combine beans, eggs, and salt in a food processor and puree until only a few chunks remain. Pour into a mixing bowl. Put the onion in the food processor and pulse until finely chopped. My kids prefer not to hear the crunch of onion in their food so I chop it finely. It will cook faster. Stir onion, cilantro, zest, and sprouts into the mixing bowl with the pureed beans. Add bread crumbs and stir until its well combined. Let the mixture sit for 5 minutes so the crumbs can soak up the excess moisture. The mixture should be pretty moist, but dry enough to form stable patties. Add more moisture if needed by adding water or egg. Make it drier by adding more crumbs.
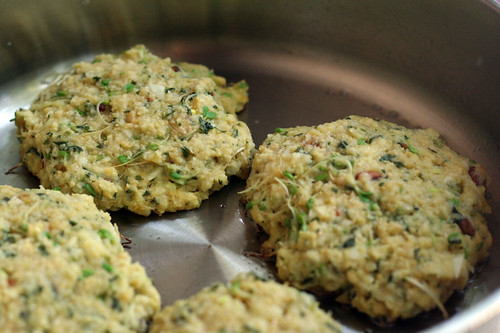
Heat the oil in a heavy skillet over medium heat. Add four patties, cover, and cook for 7-8 minutes. If the patties have not browned after 10 minutes, Heidi suggests turning up the heat slightly. Flip the patties and brown the other side until golden, about 7 minutes. Once finished, remove from pan and cool on a rack. Finish cooking the rest of the patties. The recipe should make 10-12 patties about 1.5″ thick.
A few notes: My kids didn’t like the sprouts in the mixture. I imagine that zucchini would work pretty well although I haven’t tried it yet. Some of the ratios may need to be adjusted so the mixture remains the proper consistency. Also, Heidi suggests cutting the patty in half and stuffing fillings in between the two halves. Fillings could include more sprouts, tomato, avocado, cheese, etc. I used buns, which if great too!
Roasted Grape Tomato and Garlic Pesto Dip Recipe
May 14, 2011 § 1 Comment
Yesterday, I had a 3 pints of grape tomatoes languishing in my refrigerator, basil about to spoil on my window sill, and a party to attend which required the making of a side dish. Out of theses circumstances, a very popular appetizer was born.

I started with roasted tomatoes. I’ve made them this way before when I’ve wanted more of a sun-dried texture, but for this recipe I roasted them a different way so they’d be a bit juicier (see below).

INGREDIENTS:
- 3 Pints grape tomatoes
- Olive oil
- 3/4 C. Fresh parmesan cheese, shredded
- 1 C. Fresh basil leaves, stems removed
- 1/2 C. Toasted pine nuts
- 1 Head Garlic, roasted
DIRECTIONS:
Preheat oven to 350 degrees. Wash the grape or cherry tomatoes and cut them in half lengthwise. Pour some olive oil and a pinch of salt into a large ziploc bag and add the tomato halves. Shake to cover tomatoes completely. Cover two sheet pans with tinfoil and place tomatoes, face up, onto pans.
Roast the head of garlic with the tomatoes.
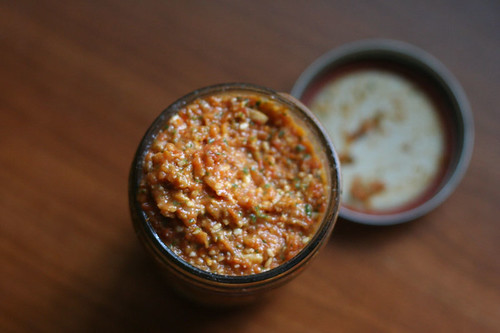
Cook tomatoes and garlic for 30 min. Place roasted tomatoes, basil, pine nuts, roasted garlic, and Parmesan cheese into an 11 cup food processor. Drizzle about a tablespoon of olive oil into processor. Pulse until well combined. Add salt and pepper to taste.* Flavor intensifies if made several hours before it’s eaten.
* Serve as a dip, spread, or sauce, hot or cold.

How to Roast Garlic
May 14, 2011 § Leave a comment
One of my favorite appetizers is roasted garlic with toasted baguettes. When garlic is roasted with a bit of olive oil, it’s pungent bite turns sweet and mild. Once roasted, each individual clove can be squeezed from it’s paper skin and spread like butter onto bread. Squeezing each clove can be messy, though, so if this is an appetizer for a party consider a tidier alternative. Peel all the cloves and whirl them for a minute in a food processor with herbs and a bit more olive oil. It makes a smooth and creamy spread.
While roasted garlic is a fantastic treat all by itself, it can also be used as an ingredient in other dishes and sauces. Use it in pesto for a milder taste, in tomato sauce, on pizza, or in homemade bread.
HOW TO ROAST GARLIC
- Heat the oven to 350 F.
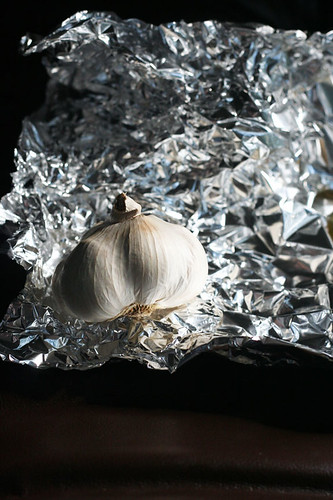
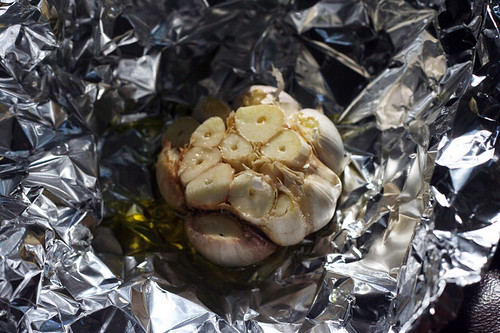
- Cut off the pointy end of a whole garlic head so that most of the clove tops are partially exposed (see photo directly above).
- Peel the extra paper skin from around the head.
- Place the head in the middle of a square of tin foil.
- Pour a few tablespoons of olive oil over the top so that it seeps into and around the exposed cloves.
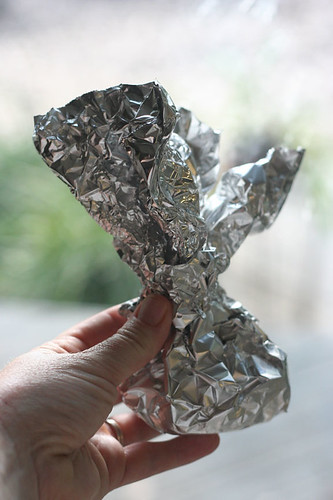
- Twist the tin foil closed and place on a metal tray (see photo below).
- Bake for about 30 minutes or until all the cloves are soft, like the consistency of room temperature butter.
- Enjoy the delicious smell coming out of your oven.
Oatcakes Revisited: Chocolate Oatcake Recipe
May 10, 2011 § Leave a comment

One of my first posts on Seed was a recipe review of Oatcakes from Heidi Swanson’s Super Natural Every Day. I didn’t give you the recipe, however, because I didn’t want to copy it directly from the book. Then I thought, Heidi Swanson’s lovely blog, 101 Cookbooks, is essentially a log of Heidi cooking from other people’s cookbooks and recording what she thought about them and the modifications she made.
Well, I made some modifications to the Oatcake recipe. I added chocolate. Really, what isn’t better with chocolate. Just remember that oatcakes are traditionally a little dry (unless you heat them up), very dense, but very tasty. They will fill you up.
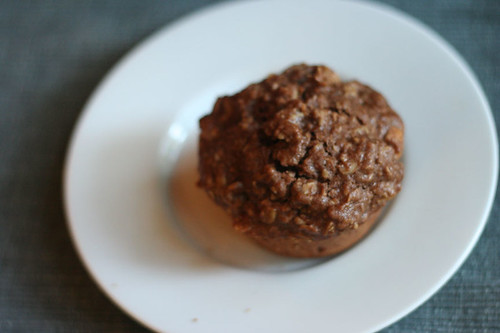
Chocolate Oatcake Recipe
(adapted from Oatcakes in Super Natural Every Day by Heidi Swanson)Ingredients:
3 C. Old fashioned rolled oats
2 C. Spelt or whole wheat pastry flour*
1/2 t. Baking powder (the original recipe calls for aluminum-free)
2 t. Fine grain sea salt
3 T. Cocoa powder
3/4 C. Chopped pecans or walnuts, lightly toasted
1/3 C. Extra-virgin coconut oil**
1/3 C. Unsalted butter
3/4 C. Maple syrup
1/2 C. Natural cane sugar
2 Eggs, lightly beatenInstructions:
- Preheat the oven to 325 degrees F. Prepare a standard 12 cup muffin tin, by generously buttering the cups.
- Combine oats, flour, baking powder, cocoa powder, and pecans in a large mixing bowl.
- Combine coconut oil, butter, maple syrup, and sugar in a saucepan over low heat. Stir until the butter melts and the sugar dissolves. Take care not to get the mixture too hot as the eggs will cook in the next step. This may take 5-10 minutes on low heat.
- Add the warm sugar mixture to the oat mixture and stir a bit.
- Add the eggs and stir until everything is combined into a wet dough.
- Spoon the dough into the muffin cups until almost full.
- Bake for 25-30 minutes until firm.
- Remove the pan from the oven and let cool before tipping them onto a cooling rack. Run a knife along the edges if the cakes don’t pop out on their own.
- Serve warm or at room temperature.
* Spelt flour and whole wheat pastry flour can usually be found at a health food store. Occasionally Publix or another large chain store will stock it in the Greenwise or natural ingredients section.** Coconut oil can also be found in the health food section of Publix and the health food store. It comes as a slightly solid state that melts very easily around room temperature. I have not detected a strong coconut taste when using it and find that it doesn’t burn as easily as olive oil at medium to high temperatures.
Omissions from the original recipe: Heidi’s recipe also calls for 1/4 C. flax seeds. I simply didn’t have them on hand and didn’t use flax seed meal because it makes the cakes too dry.
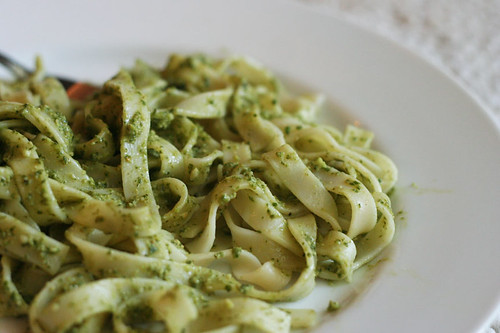
Classic Pesto Recipe
May 8, 2011 § 2 Comments

As far as I’m concerned, basil is one of the easiest herbs to grow one reason we planted some in the school garden. It has a very distinctive flavor and pleasant odor which makes it a great addition to a sensory garden (a garden whose materials stimulate the user’s sense of smell, taste, sound, touch, and sight).
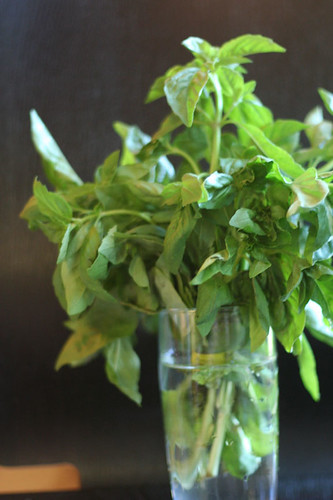
When mother nature has blessed you with a large crop of basil, the most logical dish to make is pesto, which is why I made a great big batch today. Our basil plant at school doesn’t produce quite enough to make pesto yet, but we were lucky enough to get the bundle you see below from our the CSA this week. To keep it fresh I store it like cut flowers, in a glass filled with water on the window sill.
Pesto can be easily made using a food processor although some people prefer to make it by hand chopping the ingredients for more than a half an hour. Heidi Swanson, from 101 Cookbooks, has great instructions on how (and why) to do this. my recipe will describe the food processor method.

INGREDIENTS:
2c. Basil leaves (approx.)
1/2 – 3/4c. Freshly grated parmesan cheese
3 Cloves of garlic
1/3c. Pine nuts toasted in a skillet
2 or 3 tbn Extra virgin olive oilDirections:
Remove the stems from the basil leaves. Wash the leaves well to remove any dirt or sand. Place approximately 2 cups of packed basil leaves into the food processor, add the toasted pine nuts, garlic, and cheese. Pulse the processor until the mixture is somewhat smooth then drizzle olive oil into the mixture while it is processing. Continue pulsing until it is at the desired texture.
Enjoy with a thick noodle like linguine and a good crusty bread.
Burrito Brothers Part I: Sweet Corn and Mango Salsa Recipe
May 6, 2011 § Leave a comment
Last week I had the Sweet Potato Black Bean burrito from Burrito Brothers for the first time. I’ve lived in Gainesville for almost 20 years and I’ve never ordered this burrito? How could that be? For those of you who don’t know, Burrito Brothers is basically a taco stand that used to be at the busiest corner on the University of Florida’s campus. It is undoubtably a Gainesville institution popular with students and alum alike. In fact, they will FedEx frozen burritosA few years back, after the original location was torn down, it moved to the back of a church where it is ridiculously hard to find if you don’t know where to look.
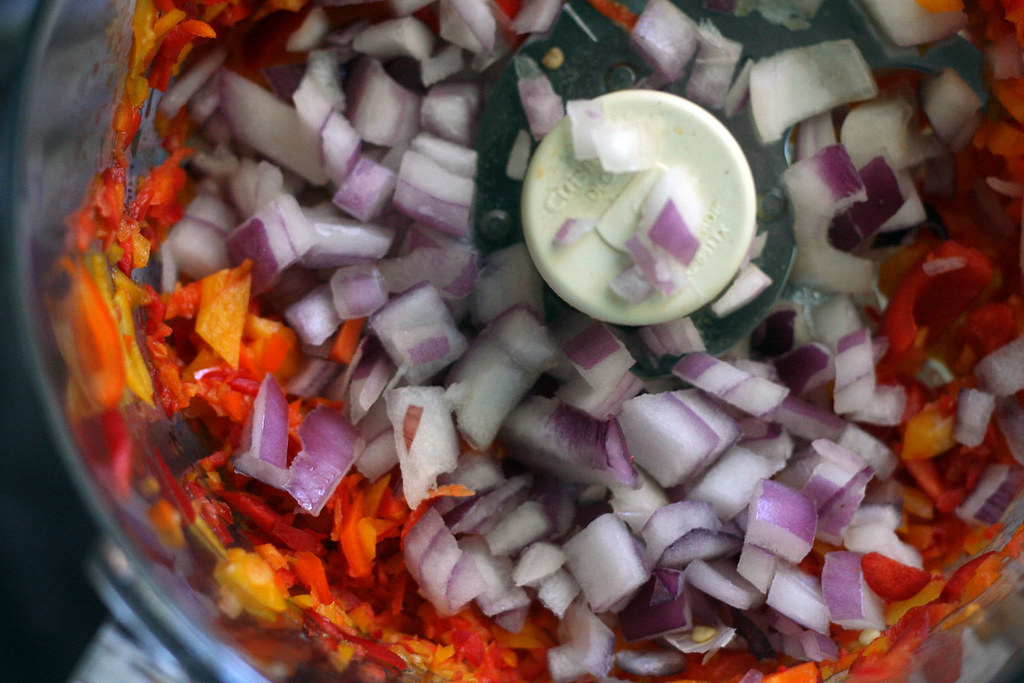
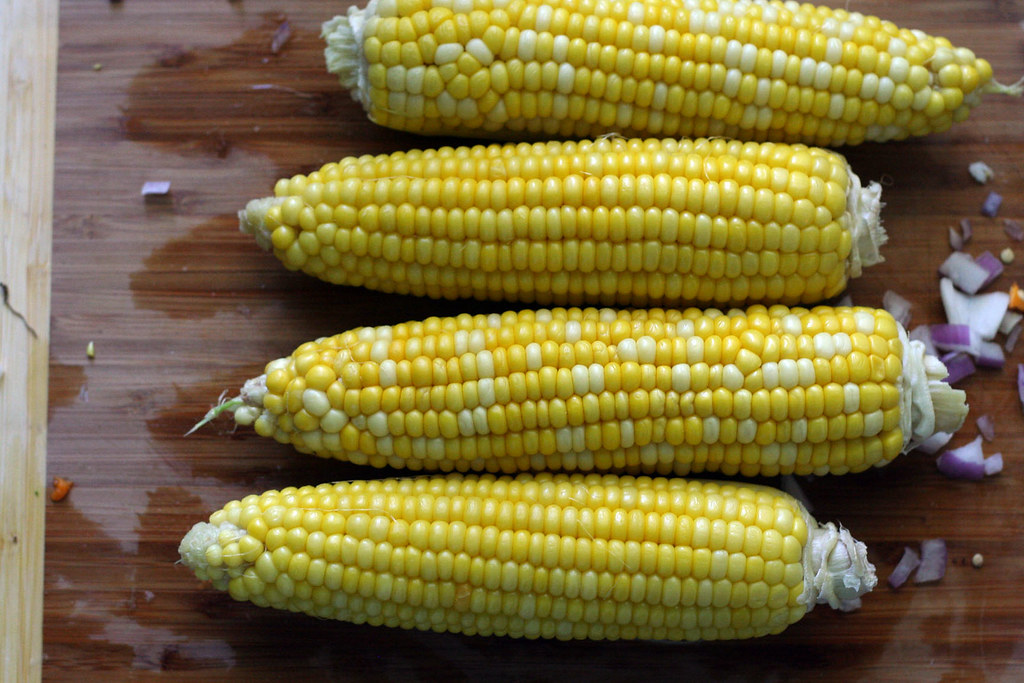
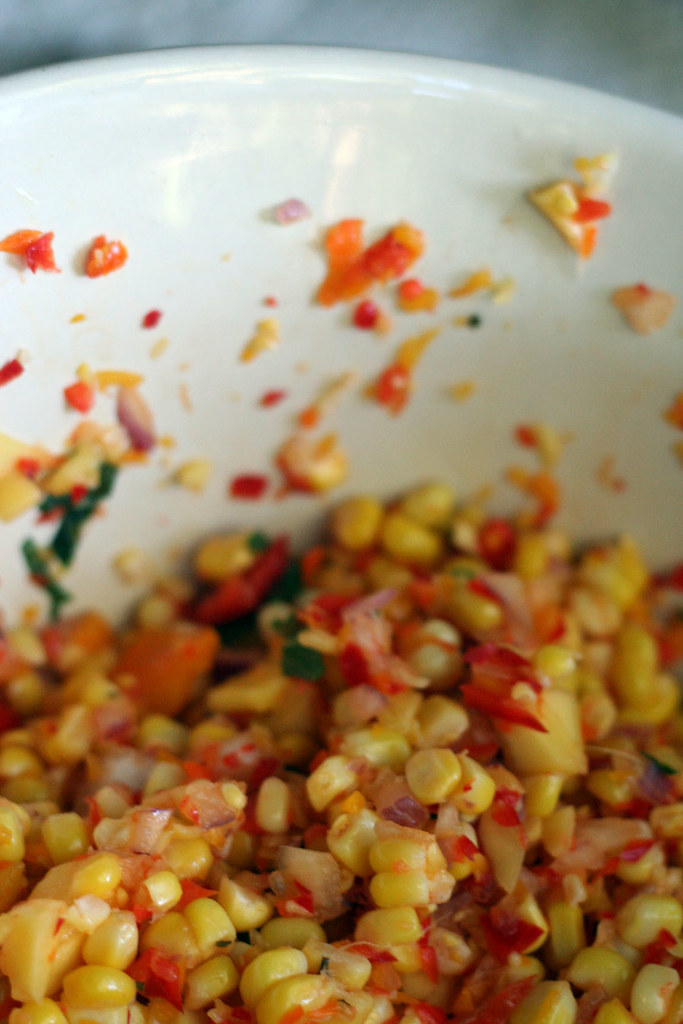
I loved this burrito so much that when I got sweet potatoes and corn in the CSA box this week, I attempted to make my own version which will appear here in two parts: Part 1 Salsa, Part 2 The Burrito. In addition to the sweet potatoes and black beans, the burrito also includes a sweet corn salsa. I figured the first step to replicating my Burrito Brothers’ burrito was to figure out the salsa. All though it wasn’t exactly the same, I think it works.
Sweet Corn and Mango Salsa Recipe
This recipe is not exact so make it according to your own taste. I used a food processor to chop the peppers and corn.
Ingredients:
- 3-4 Ears cooked sweet corn stripped from the cob (you can use a can of corn)
- 2 Ripe Mangos (cubed)
- 1 c. Sweet peppers (chopped)(I used mini sweet peppers, but you can use a red pepper)
- 1/2 c. Sweet onion (chopped)
- 4 tsp Fresh chopped mint
- 4 tsp Fresh chopped cilantro
- Juice from about 1 lemon
- Salt to taste
- You could also add a bit of hot pepper to give it a kick.
Directions:
Combine all ingredients into a large bowl. Stir to combine the ingredients. Season to taste. You can eat it right away or let it sit for about an hour in the refrigerator to let the ingredients meld together. And this is what you get…
The Purpose of Seed
May 1, 2011 § 1 Comment
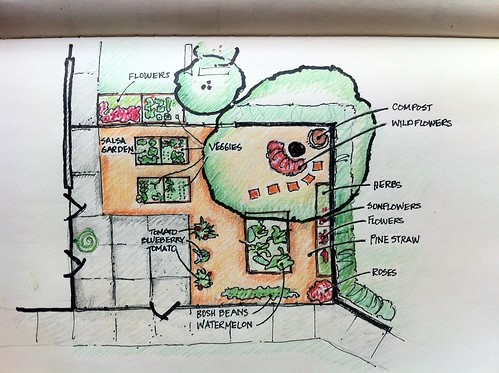
I’ve been helping teachers at a local elementary school design and maintain a school food garden. I am a landscape architect by trade (a stay-at-home-mom by choice) and have a great interest in using landscapes as classrooms. I started Seed not only to document my ideas and the process of designing, setting up, and using a new vegetable or fruit garden, but also to plant “seeds”. In a figurative sense, seeds are ideas that start small and take root in the mind or soul, flourishing into something meaningful and inspirational. Thus my posts on Seed will on a broad range of topics – food and recipes, gardening, landscape design, and education to name a few.
Gardens are extremely important for learning and discovery at every age. Not just for math or science, gardens can be used as a way to develop character and learn responsibility. These posts are meant to share the information I’ve learned while starting the school garden. The information contained within is helpful whether you’re contemplating a garden at home, in your neighborhood, or at your neighborhood school.
Please note that these posts are my ideas based on experiences in the garden, professional practice and a conglomeration of school courses and reading. This blog is not meant to provide professional advise, but to log ideas, triumphs and failures in designing, planning, and using learning gardens.
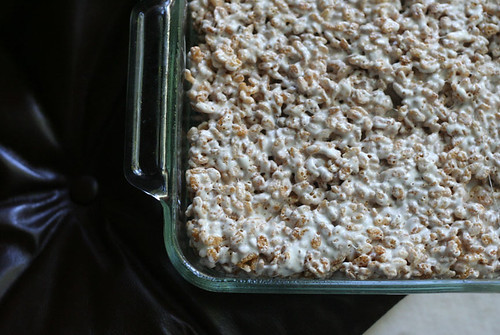
Brown Rice Treats with Browned Butter and Sea Salt Recipe
May 1, 2011 § 1 Comment
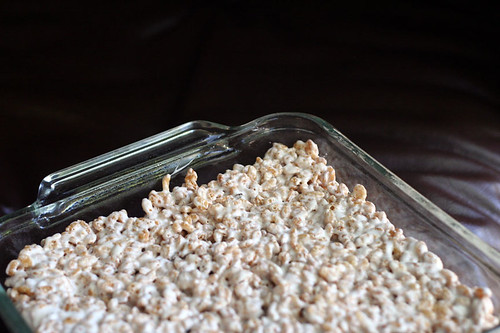
The kids and I went to Sweet Dreams this afternoon to stave off boredom. Sweet Dreams is a locally-owned ice cream shop that makes all sorts of weird flavors like sweet corn, Birds an Bees (local honey and sunflower seeds), guava & cheese (which is one of my new favorites), and salted caramel. I had the salted caramel, which made me crave a recipe I found on Smitten Kitchen this week.
This really is a children’s treat all grown up. The browned butter is so flavorful – and then the little bursts of sea salt throughout. So, so good. The original recipe used white rice crisp cereal. I decided to use brown rice crisps which can be found in the health food sections.
INGREDIENTS:
1 Stick of unsalted butter
10 oz. Bag of marshmallows
6 C. Brown Rice Crisps Cereal
1/4 tspn Course sea saltDIRECTIONS:
- Prepare a 8″x8″ square baking pan sprayed with non-stick spray or buttered.
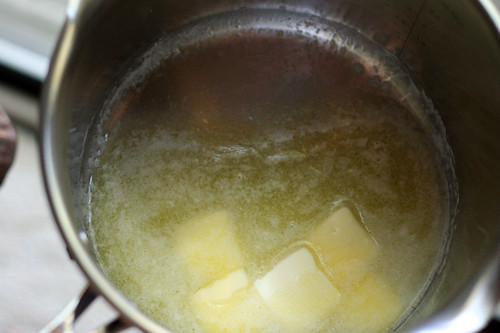
- Brown the butter: Melt butter in a large saucepan. The butter will foam, get golden and transparent, and eventually turn a toasty brown. It will also smell a bit nutty. Stir frequently throughout.
- Remove from heat and add marshmallows. Stir until melted and smooth. Heat on low if marshmallows do not melt and become smooth.
- Add the brown rice crisp cereal and stir until mixed thoroughly. Place in baking pan fairly quickly, before it sets. Pat down with a spatula and let cool and set. Serves 8 – 1″ squares
Fresh Produce


")
